Teddy Bear Cupcakes
This post may contain affiliate links. For more information, read my disclosure policy here.


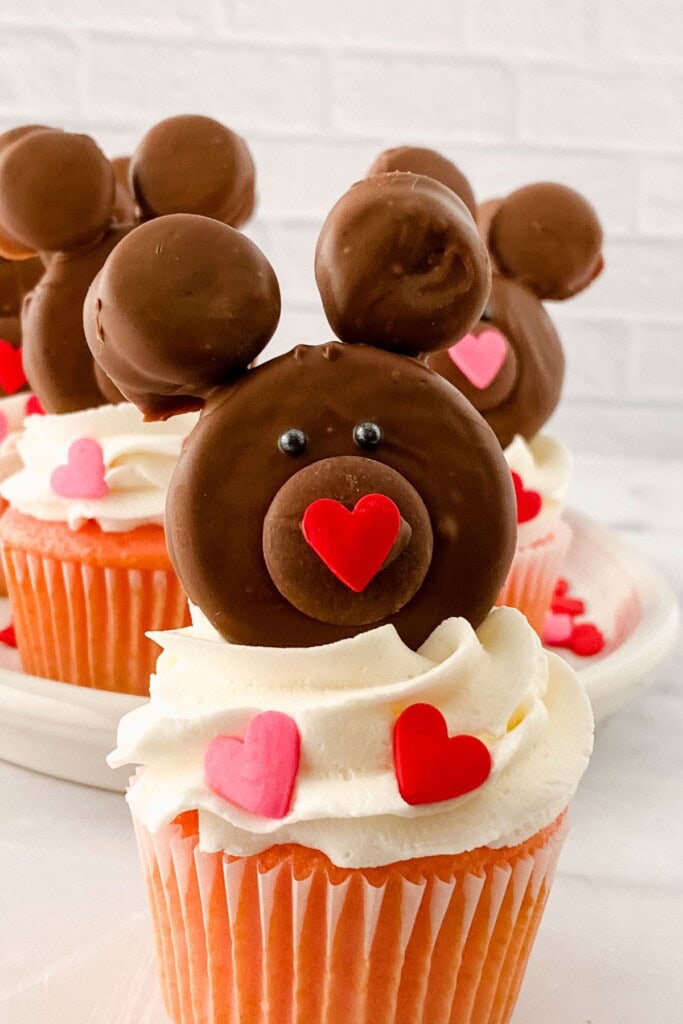
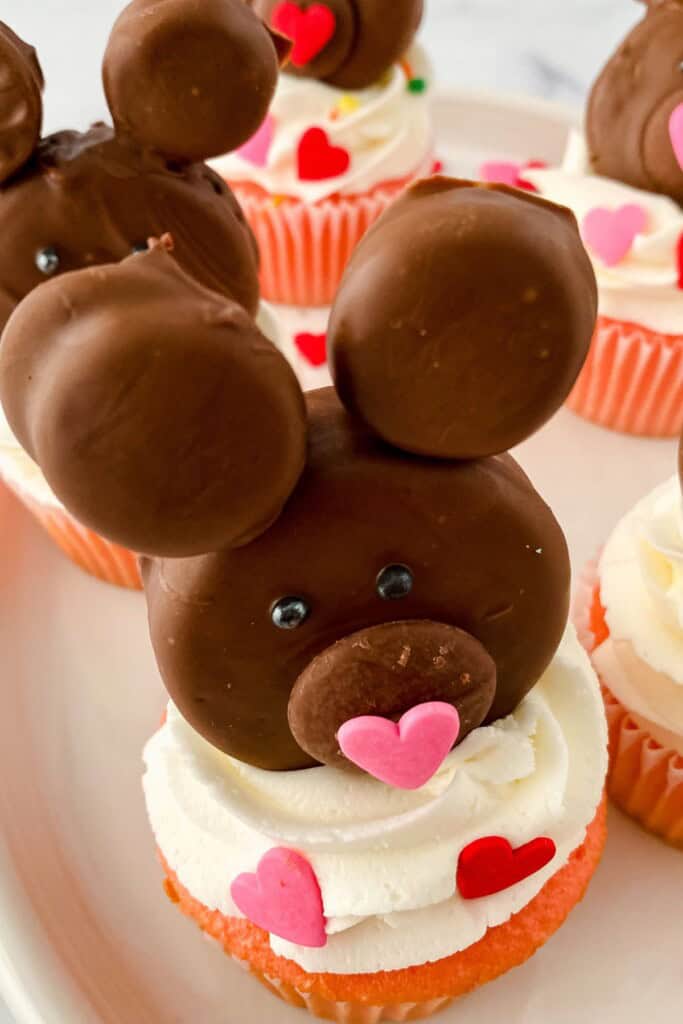
My Teddy Bear Cupcakes instantly makes everyone smile, no matter their age. There’s just something irresistible about a soft, fluffy cupcake topped with a sweet little bear face. They are simple enough for a weekday bake, but charming enough for parties, classroom celebrations, or Valentine’s surprises.
If you want so more creative cupcake ideas, try my Pig Cupcakes and my Spaghetti and Meatball Cupcakes.
Why this Teddy Bear Cupcakes Recipe Works
These are the cupcakes kids race toward, adults secretly adore, and bakers love because they’re easy, fun, and endlessly customizable. If you’re looking for a dessert that brings joy the moment it hits the dessert table, these little bears are it.
- Adorable + approachable: These cupcakes look impressively cute, but the decorating steps are simple enough for beginners and fun for kids to help with.
- Minimal ingredients: Just six decorating ingredients plus your favorite cake mix for the bear-themed cupcakes. No complicated baking required.
- Customizable: Use any cupcake flavor, swap cookie types, or change the sprinkle colors for different holidays.
- Perfect for gifting: These make sweet Valentine’s treats, birthday party favors, or classroom goodies.
- Fun to Make: This recipe is fun and kids love to help crete them.
- Portable: It’s easy to pack and take with you, making it great for lunches or picnics.
How Do I Make Sure That the Ears and Other Components Stick to the Bear Face?
Keeping the bear ears securely in place is all about using the right “glue” and giving the decorations time to set. After dipping the Oreos, let the chocolate thicken slightly so it’s not too runny, then attach the ears and gently press for a few seconds to help them stick. To keep them from sliding while they dry, prop the ears with a folded paper towel, toothpick, or the edge of a bowl, and then chill the finished bear faces in the fridge for a few minutes to lock everything in place. Working in a cool room and decorating in small batches also helps prevent the chocolate from softening, ensuring your little bears stay cute and sturdy.
Pro Tip to Make Bear Cupcakes
Purchase premade cupcakes and chocolate covered Oreos to make this project go a little faster.
Ingredient Notes for Cute Bear Cupcakes
Make these adorable teddy bear cupcakes with just a few simple ingredients. You will need some candy eyes and some chocolate frosting and the following ingredients.
Get the full printable recipe with specific measurements and directions in the recipe card below.
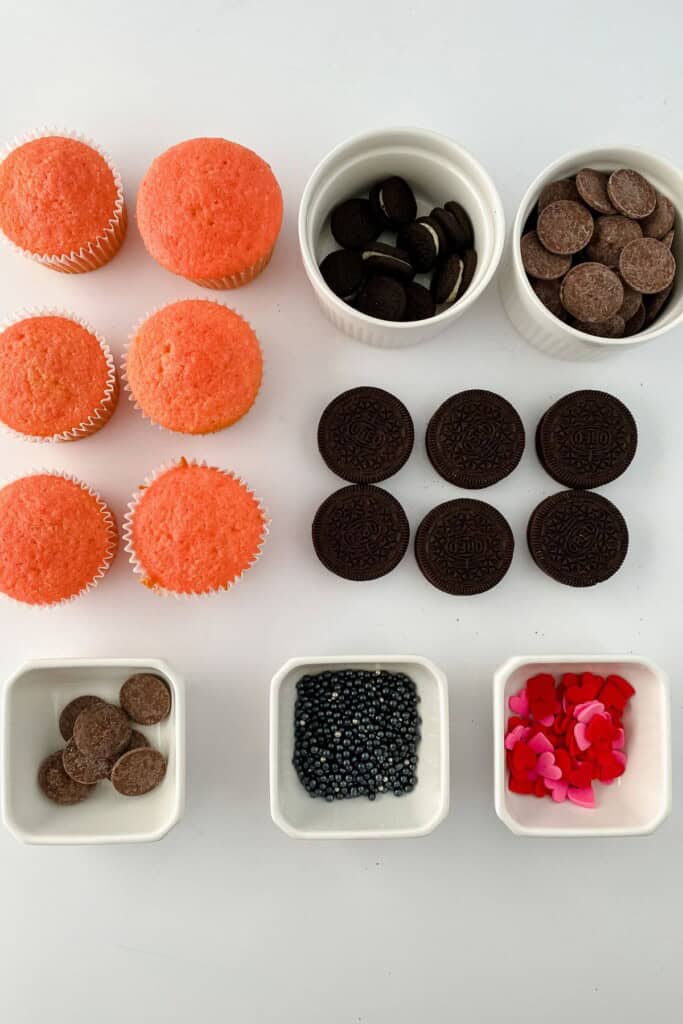
- Double‑Stuffed Oreos: These form the bear faces. Double‑stuffed Oreos are essential because the extra filling gives you more surface area to dip, decorate, and attach the ears securely.
- 24 Mini Oreos: They become the bear ears. Their small size is perfect for creating that rounded teddy‑bear look, and they attach easily to the larger cookie base for the two ears.
- Chocolate Melting Wafers: The melted chocolate acts as both the coating and the “glue.” It gives the bear faces a smooth, shiny finish and helps the ears, nose, and eyes stick firmly in place once it sets.
- 12 Pre‑Baked Cupcakes: The base for the entire treat. You can use any flavor you love, boxed mix or homemade, The decorated bear faces sit right on top to turn simple cupcakes into adorable showstoppers.
Variations and Substitutions – Polar Bears
For a winter baby shower or birthday parties make white bears. You can use white cupcakes in place of chocolate cupcakes. You can use a jar of frosting or use your favorite buttercream frosting recipe.
- Oreos: Use flavored Oreos for a fun twist. Or use any similar sized sandwich cookie or vanilla wafers.
- Sprinkles: Swap black pearls and heart sprinkles for piped melted chocolate or colored frosting.
- Chocolate candy: Instead of melted chocolate, you can coat the cookies in decorating frosting or candy melts.
- Polar Bears: Use white chocolate wafers, white frosting, and coconut or powdered sugar for a snowy polar bear look.
- Add-ins: Mix nuts, coconut, or chocolate chips into the cupcake batter for extra flavor.
Special Equipment Needed to Make Cupcakes
You will need mixing bowls, a mixer and a wilton decorating kit to help you make these easy bear cupcakes. If you are making the cupcakes from scratch you will need a cake mix and the ingredients to make them.
- Wilton Deluxe Cake Decorating Bag with Piping Wilton Tips and Pastry Bags, 46-Piece to make the frosting fur.
- Parchment:You will need wax paper or parchment to rest the components on. You will need to lay your chocolate faces.
How to Make Adorable Bear Cupcakes
Teddy Bear Cupcakes are an adorable treat for your family for Valentine’s Day or for a kids celebration. They’re also adorably perfect for a birthday. The cute cupcakes are great as an easy project to make with your kids because so much is premade.
Get the full printable recipe with specific measurements and directions in the recipe card below.
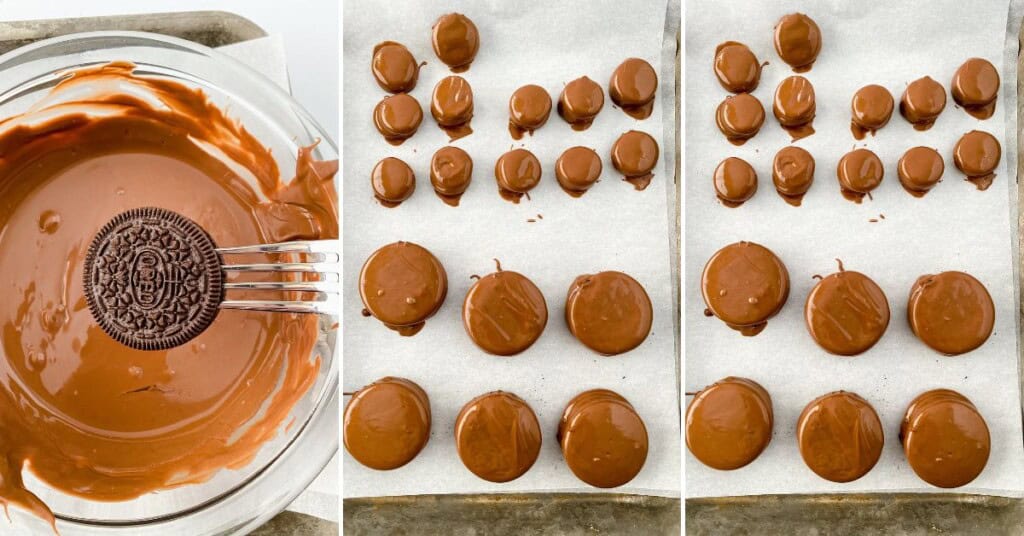
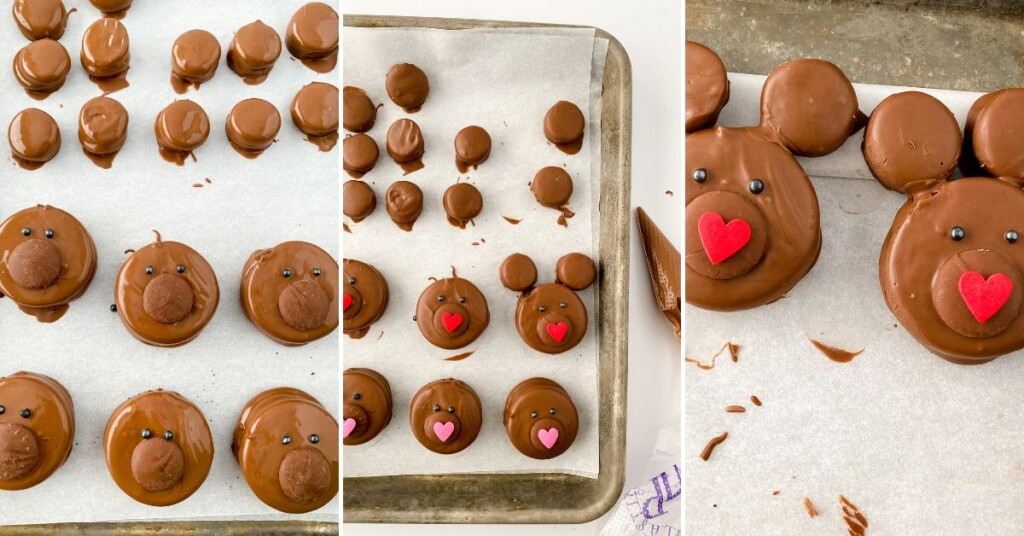
- Dip and Set the Oreos: Melt the chocolate, dip all the Oreos until fully coated, and use a fork to lift them out. Tap off the excess chocolate and let them set for about 5 minutes. Pour any remaining melted chocolate into a piping or zip‑top bag and set it aside.
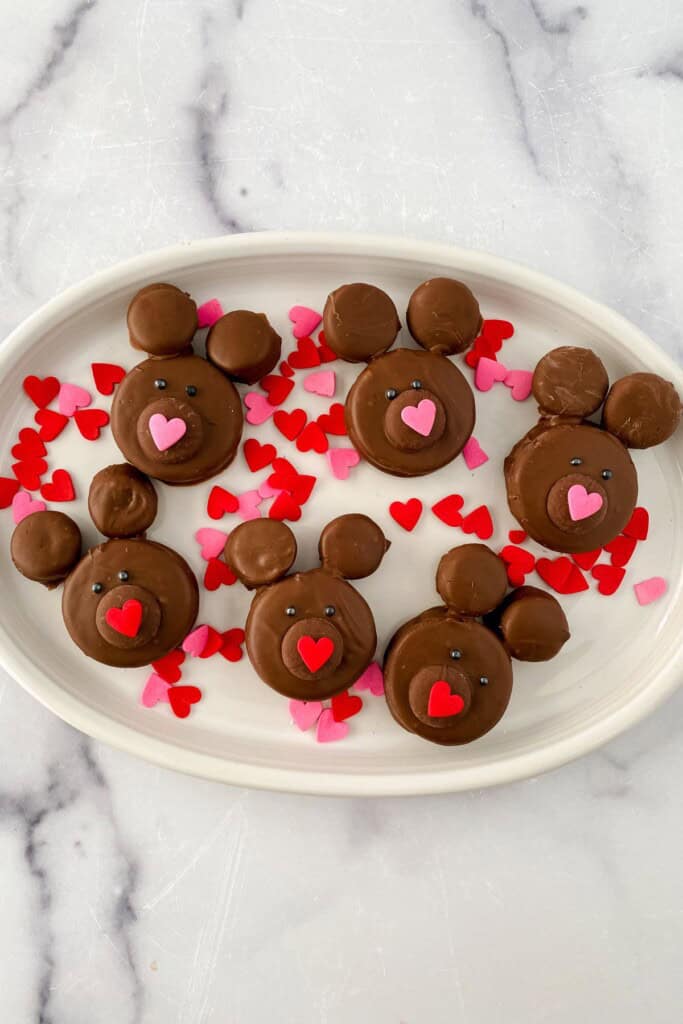
- Add the Face Details: While the chocolate is still slightly tacky, press on a chocolate wafer for the snout and place the sprinkles for the eyes. Let the cookies dry for about 20 minutes, then warm the piping bag for 15–20 seconds and use it to attach the heart sprinkle nose and the mini Oreo ears.
- Chill the Bear Faces: Place the finished bear faces in the fridge for 15 minutes so the chocolate firms up and they’re easy to handle.
- Assemble the Cupcakes: Pipe frosting onto your cupcakes, then gently place each bear face on top—either standing upright or laying flat.
Prep Ahead Suggestions – Bake and Frost
Store components separately and assemble the day you plan to serve. A perfect way to get ahead for a birthday or baby shower. Make these simple steps in advance.
- Bake cupcakes in advance so they cool completely before decorating.
- Dip Oreos ahead of time and let them set—this makes assembly much faster.
- Grab and seperate your sprinkles for the noses and eyes.
Alternate Cooking Methods for Adorable Dessert Kids Will Love
Our classic swirl cupcakes, but with a cute teddy bear embellishment can be cooked several different ways. Since the cupcakes themselves come from any boxed mix, you can bake them several different ways.
The decorating steps remain the same.
- Convection Oven: In a convection oven, reduce the temperature slightly for baking.
- Air Fryer: Bake in a countertop oven or air fryer (if your liners fit), baking in small batches.
How to Store, Freeze and Use Leftovers
You can turn your child’s next birthday party into a teddy bear picnic with these easy party cupcakes.
- Storing: Store decorated cupcakes in an airtight container in the fridge for 4–6 days. Chilling keeps the chocolate‑coated Oreos firm.
- Freezing: Freeze undecorated or decorated cupcakes in an airtight container for up to 3 months. To thaw, place in the fridge and let them defrost slowly.
- Using Leftovers: Crumble leftover cupcakes into parfaits with whipped cream. Chop leftover bear faces and use them as ice cream toppings.
Common Questions About These Cupcakes For Valentines Day
Yes, use a gluten‑free cake mix and gluten‑free Oreos. Pipe the eyes and nose with frosting to avoid sprinkle concerns.
You can, but Double Stuff works better because the thicker filling gives the dipped cookie more stability and makes it easier to attach the ears.
Let the chocolate set completely before handling the bear faces. You can also use gloves or hold the cookie by the edges.
Expert Tips for Making Valentine´s Day Cupcakes
You can have fun making these cupcakes. Remember to cool before starting the decorating process. You can make cute brown bears. Also add a smile with black decorating icing.
- Dip the Oreos halfway first if you want extra control. A partial dip sets a base layer that makes the final dip smoother and more even.
- Use a fork, not tongs, for dipping. A fork lets excess chocolate drip off cleanly so the coating stays thin and glossy.
- Tap the fork gently on the bowl after dipping. This removes excess chocolate and prevents thick, lumpy edges.
- Decorate while the chocolate is tacky, not wet. If it’s too melted, sprinkles slide; if it’s too firm, they won’t stick. The “tacky stage” is the sweet spot.
- Chill the bear faces before placing them on cupcakes. Cold chocolate is sturdier and won’t smudge when you press them into the frosting.
- Chocolate: If the chocolate seizes, add a teaspoon of coconut oil. This smooths it back out and gives a shiny finish.
- Cooling: Keep your hands cool. Warm fingers can melt the chocolate and shift decorations. Rinse hands under cool water and dry well before handling.
- Unique: Add personality to each bear. Tilt the ears, adjust the nose placement, or use different sprinkle colors to give each bear its own expression.
- Serve this recipe with More cupcakes ideas for valentines: Valentine Cookies, Homemade Pop tarts or Chocolate Strawberry Cupcakes.
More Recipes You Might Like


Teddy Bear Cupcakes
Equipment
Ingredients
- 12 Double stuffed Oreos
- 24 Mini Oreos
- 10 ounces Chocolate melting wafers
- Black candy pearls
- Heart sprinkles
- 12 Pre-baked cupcakes
Instructions
- Melt the chocolate and dip (all) the Oreos in it coating them completely.
- Use a fork to help you remove the Oreos, lightly tap off excess chocolate and allow to set for about 5 minutes.
- Pour the excess chocolate into a piping bag or ziplock bag and set it aside.
- Carefully add a chocolate wafer (for the nose). Place the sprinkles for the eyes and allow to finish drying for 20 minutes. Reheat the chocolate in the piping bag for 15-20 seconds.
- Use it to glue on the heart for the nose and the ears.
- Allow the bear face to chill in the fridge for 15 mins to make sure it can be handled.
- Pipe frosting onto your cupcakes.
- Place the bear faces on the cupcakes standing up or laying down.
Christina’s Notes
- This Recipe Can be Doubled: A great recipe for a crowd. Simply increase the ingredients proportionately and split it into more cupcake pans.
- Add Coconut: Truly a fun twist would be to add coconut to a polar bear, white cupcake.
- Short cut tip: Purchase premade cupcakes and then just do the decorating.
- Variation tip: Pipe little heart noses or use heart candies for the bear’s nose. So sweet.
- Alternate ingredient: Add nuts or chocolate chips to the cake before baking for an added boost of flavor.
- Hack: Use a folded paper towel to help hold the “ears” in place while they dry.
For more helpful information about this recipe, such as variations, substitutions and other pro-tips, scroll up on the page.